Quantcast
Channel: Buzzing with Ms. B
Viewing all 369 articles
Browse latest View live

6 TPT Tips I learned in Vegas

$
0
0
A couple days ago, I blogged about the adventures I had in Vegas, but I knew I was far from done with sharing about this conference. The whole reason I went (aside from the free drink coupons) was to learn about the business!

 I know so many of us have had similar experiences on TPT - we start out as basic sellers and plug along for a few months (or years) and decide that maybe we're ready to take the plunge. We debate the pros and cons of spending the 60.00 to become premium sellers. Finally, we decide to "just go for it" and "hopefully I'll make the 60.00 back!" 

So we put up products, sell items, get feedback and cheer, get feedback and cry, make adjustments, and try to figure this mess out. But it's better to share, because, as Rachel Lynette said (that JRK said before her), "A rising tide lifts all boats."


During the sessions at the conference, I heard a few specific and concrete tips that I have begun implementing and I though you'd like to as well. Here's what I learned in Vegas:


Tip # 1 
This one was big. I know that, because we're teachers, we love cute. We say it all the time, "Oh, that's so cuuuuute!" But in several of the sessions, they mentioned the importance of having functional product names. If your product is titled "Pop the Top!", NO ONE is searching for it. It's cute, but the only people who will end up on that page are the ones who clicked through from a place you're advertising it. Name the product something functional, like "Mixtures and Solutions Science Stations Activity and Game" and people might actually search for some of those words. The product cover can include any name you want, but the name of the product on TPT when you "Add a new product" should be searchable. BIG TIP for me!


Tip # 2
This one's easy. Just do it. Add a custom category and then put you products in it! It makes your store more easily navigated. And it's easy to do! On a Mac, to add more than one custom category for a product, you can select the first category, hold down the command key and then select the second or third one you want. 


Tip # 3
For me, finding a community is tricky. I tend to be a bit of a lone wolf and it's hard for me to sustain relationships when I've never seen you. Consider me like a two-year-old - the face on the screen in the little TPT circle is hard for me to connect to a real living, breathing, problem-solving person. So I have to really work hard on building a community that I consistently communicate and organize with! This conference, I think, really helped me in that respect. I met real people and I'm looking forward to organizing with them!


Tip # 4
I spent all day yesterday doing this one. When a piece of feedback is clicked on the little "Marked as helpful" button, that piece of feedback is cycled to the top of the string of feedback for that product. The more times it's clicked, the higher it goes up the chain. You as a seller can only click it once, but DO IT! Read through your feedback and click "Mark as helpful" for any feedback that is specific and highlights the strengths of your product. That feedback will show up first and it will give your buyers a good picture of why they might like to buy your product. Because let's be honest: "Thanks" or ":)" never convinced anyone to buy anything.


Tip # 5
Rachel Lynette told us this one, and I was like, "Oh. Duh." You know that little quote space on the top of your store? Well, on mine, and apparently on many sellers', it read, "Follow my blog, Buzzing with Ms. B, for teacher tips and tools!" Well, Rachel, (this is so duh that you probably already know it, but I'm going to say it just in case) said, "Don't do that. Don't send people away from your store when you've finally gotten them there. The purpose of your blog is to drive people TO your store, not the other way around." O.M.G. that was embarrassing. Because she was talking to me.

Use your blog, pinterest, and facebook to provide content at least 80% of the time. Don't do freebies all the time, because then your followers/fans/viewers expect something tangible all the time and they'll wait for it. Do freebies and giveaways randomly and infrequently. 


Tip # 6
Possibly my favorite piece of advice. Rachel Lynette was describing how to work with other TPT sellers, and she encapsulated several guidelines into this one guideline. "You know, don't be a jerk." I wrote it down verbatim, because I knew I wanted to quote it. It's my kind of advice. It applies not just to blogging, or selling, or any other specific niche, but to the world. If you're a jerk, according to Rachel Lynette, "you will not get invited to play in other peoples' reindeer games." So if you've made some mistakes, ask for forgiveness and try not to do that again. 

I hope these TPT tips I learned were helpful to you, too. If you got something out of this post, click over to check out all the other blogs that linked up with Mrs. Russell's Room for her Learnin' in Vegas: My Reflections Link-Up. It's worth the visit!

Pin It

Book Giveaway: The Adventures of Ai

$
0
0
This is my favorite line from The Adventures of Ai, a brand-new book by Craig Bouchard. "You have to understand something about my sisters and me. We don't giggle. We laugh."The story begins here, with three little girls desperate for a story from their father. Through changing perspectives and flashback structures, the writer pulls us back, farther and farther from present-day life, into history.
Despite its cover, The Adventures of Ai is written for older readers (not my K-5 babies), such as middle school students. 


This story is a story-within-a-story...within-a-story. The title character Ai is three stories deep (kind of like Leo DiCaprio in Inception). Before you ever  reach Ai, you are introduced to surprising details about the Japanese culture, told from the perspective of someone just learning to navigate life and language in a new place. The main character is getting to know the Hara family in Tokyo. His view as an outsider to Japanese culture helps us learn about these ways, different from my own, alongside him. The actual photographs included throughout the text help us to connect to the storyteller.


Through casual conversations, we meet historical figures we may already know, but with a new perspective. And from there, the story of Ai takes off. Ai has a charming ability to interact with and understand nature. For those of us who fell in love with The Secret Garden, stories of greening things remind us of our own childhood imaginings! Out of the entire book, this is the piece I enjoyed the most. I love a fantasy, and you can't go wrong with a fantasy in a forest. Ai faces troubles and decisions and has to find her own mental fortitude to solve them!


To purchase The Adventures of Ai, visit iTunes, Google Books, or Amazon.
And it turns out the The Adventures of Ai isn't just a book. It's a game, too. 
To check out the new game, click over to the App Store!


To enter to win your ebook of The Adventures of Ai, check out the Rafflecopter below! Two lucky winners will receive this ebook!
a Rafflecopter giveaway
Pin It

Enter the eBook Giveaway!

$
0
0
If you haven't already entered the eBook giveaway, it's so easy to do! 
Two lucky winners will receive a copy of The Adventures of Ai by Craig Bouchard!

Pin It

Wedding DIY: Chalkboard Welcome Sign

$
0
0


Our wedding was back in October, and I've had this huge pile of pictures and DIYs that I wanted to share with you readers! I finally put them together this week and so I should have posts ready for the next seven Monday Made-Its! The first one I'm sharng was a fun project! I bought a simple chalkboard from IKEA and fancied it up for our wedding to greet our guests!


 I cut a piece of fabric to fit in the chalkrail that matched our wedding colors. I used string, hot glue and scrapbooking paper to make a little bunting to drape across the top, and in one corner I glued some paper flowers matching our wedding colors.


Then I found these little jars and popped fake daisies in them to match my bouquet. I printed out the text I wanted on computer paper using fancy fonts and spent about forty-five minutes recreating the lettering and the little bride and groom outfit underneath. It's not perfect, but when I look at it, I'm kind of amazed I did it at all lol. Considering it was the night before the wedding!


Then I wrapped the top part of the chalkboard in saran wrap to protect the chalk from smudging while we transported it to the church. We placed it in front of the church and later in front of the house for the reception and party to greet our guests!
Pin It

Wedding DIY: Old-Fashioned Card Box

$
0
0

So you've probably seen these wedding card trunks all over pinterest because they're so cute! 


I knew my mom had this little piece of luggage in her house, so I stole it.


Samsonite....fancy.....


And I cleaned it! It was quite old.
I cut the letters for the word "Cards" out of the fabric in our wedding color - blue- and 
I used these little canvas bunting flags to spell out the word. Thinking I would be slick, I layed the letters down facedown and hot glued the backs. Then I stuck a bunting flag on each one and glued a ribbon across the top of the bunting flags to make a little banner. After that, I flipped it over.... and realized I did it backwards. Duh.


So I cut the flags apart and glued them back together the right way.


To add some sparkle, I used some glitter and Elmer's glue to fancy up some tiny clothespins. 


Then I clipped one on the top of each bunting flag! Easy peasy card holder box!


Pin It

Wedding DIY: Etched Mason Jar Candle Holders

$
0
0


For our wedding last October, because we had the dinner and party outside, I knew I didn't want flowers as centerpieces because my mother's backyard is already full of green and flowers! So I hunted around for ideas to make a simple candle centerpiece unique and special.

These jars were a huge hit and easy (and better yet: cheap) to make! To start, I had my family and friends collect as many jars as they could. Spaghetti, jelly, salsa, olives and more come in jars! 


Once I had a large box full of jars, I filled the sink with hot hot hot soapy water and scrubbed the labels off witha steel wool scrubber. Sometimes this took some hard work, but those jars were free so you know I was going to find a way to use them!


After the jars were clean and dry, I used some handy dandy materials I bought from Michael's to etch them. Martha Stewart produces an etching cream that works very well. It comes with a little brush. Separately, I purchased some Martha Stewart sticky vinyl stencils. The stencils were surprisingly durable and lasted for over 130 jars. 


I stuck the stencils on several sides of the jars and painted over them with the etching cream. Then I let them dry and stuck them back in the sink. I used a sponge to clean off the jars with the stencils still on. Then I peeled off the stencils and laid them out on a plastic sheet. 


And then I cleaned the jars again, making sure I took off all of the residual cream


It was some work, but they were awfully affordable centerpieces and they turned out lovely.

For more great ideas, check out the link-up at Fourth Grade Frolics!


Wishlist Blog Hop

$
0
0
 photo Button_zpsfbf1e05c.png

I am so excited to be participating in the first event this great group of bloggers have put together! I met these awesome ladies in Vegas and we've had a blast since then putting together our first Blog Hop Giveaway!
 
HopStop2 photo Slide4_zps6d3cdb31.png

 My product for the giveaway is Community and Citizenship Pack, designed for grades 2-3 to learn about types of communities and traits of citizens. It's the most wishlisted item in my store! 
I spent a day revamping this product this summer using some new clipart and some simple, clean borders! It should be even more readable and usable than before!


To enter the giveaway, just use the Rafflecopter options below!


a Rafflecopter giveaway


Click over to Mrs. Russell's Room to collect even more entries for the Wishlist Giveaway! 


Pin It

Bright Idea: Response Rings to Check for Understanding

$
0
0
It's that time again! Time for all the little people to come and ruin our endless summer! Just kidding. Hopefully you're as excited as I am for this new school year because it's coming whether you want it to or not. Heehee. And here's a Bright Idea to help you be ready!


Have you ever taught a beautifully, meticulously planned lesson, delivered it to perfection, and then watched in horror as all of your kids proceeded to butcher their assignments? What happened? you thought. Where did I go wrong? 

This happened to me...a lot... especially my first year or two of teaching. And then I realized what I was missing.

One of the most important things about teaching a great lesson is constantly checking for understanding and making sure students are engaged in the thinking of your lesson on an individual basis. To help do this is a quick, easy way, I created these simple and affordable tools! 


Response Rings to check for understanding!

Response Rings are so versatile and easy to make. I take five index cards for each student, in five different colors. 


I label each index card with specific responses that I anticipate I might want students to use during a lesson, and then I laminate them.

This side I labeled with A, B, C, D, True/False, and Yes/No.


This side includes mathematical operations and their corresponding visual representation that I want kids to use in their problem solving.


Then I hole-punch them and put them on a ring.

Each student has a ring during every lesson. I ask them to take out their Response Rings and then I pose a specific question. This could be "What operation are we going to use to solve this problem?" or "Which is the better answer? A, B, C, or D?" or "From the details in the chapter, is it reasonable to predict that the Nick will follow this new rule?"


Then I ask them to "flash" me the answer! They hold their response card out in front of their chest (not waving it in the air- this discourages copying) and I get a quick check of who's with it, who's lost and what I need to do next! You can quickly scan the room and, because they're color-coded, get a visual picture of how the kids are responding! It holds all kids accountable for thinking and deciding on a response to your questions.


Easy Peasy but it makes all the difference!


If you enjoyed this bright idea, follow me on TPT, facebook, or instagram for more great ideas!
For more bright ideas from more than 100 bloggers, please browse through the link-up below and choose a topic/grade level that insterests you! Happy browsing!

Pin It

Easy DIY Gift: Decorative Clothespin Pushpins!

$
0
0
The past few years, I've made something small as a "welcome back to school" gift for my teachers. Two years ago, I made Rollo pencils, and last year, I made flower pens. This year, I went for something easy and useful! Decorated clothespins with thumbtacks on the back!


They're so easy to make, too. I made a couple hundred- enough for all of our faculty and then some - in just a couple hours. Basically, my husband told me, "You should really watch that last Wolverine movie. It was really good," and I watched it with one eye while doing this will all the rest of me. 

I started out with a ton of clothespins and some washi tape. I went a little crazy here and chose waaaaay too many styles. Couldn't help myself. Tape across the top of each clothespin and tear off the tape after the edge.


Then I flipped them over and used scissors to snip off any excess. Some tape is exactly a clothespin
s width, so it fits beautifully! And some tape has to be trimmed not only at the ends, but along the sides as well.

Then I glued a thumbtack to the back of each with a glue gun and cut a million little cardstock cards in a few different complimentary colors. I clipped three clothespins to each card.


After that, I used a permanent silver marker to write a little signature and I was all done! 
Easy Peasy!


Pin It

Wedding DIY: Circle Garland Backdrop

$
0
0

So a few months before my wedding, I was pinning away and I saw all of these beautiful photo backdrops. And I thought, "I can do that."

And it turns out, yes, I did.

I used these supplies (string, a 2-inch circle punch, double-stick tape, and clothespins), plus a lot of pretty scrapbooking paper in our wedding colors and a five-foot wooden dowel.


I started by cutting long pieces of string and taping them down to one end of my dining room table. The string pieces were long enough for the height of the backdrop, so about five feet long. 


On the other end of the string, I attached a paperclip to keep it from blowing around too much, but a metal washer would've probably been a better idea.


Then I cut approximately a million circle squares of all different shades of our wedding colors (blue and yellow-gold)


I placed the circles at a variety of intervals under the string. 


Then I stuck a piece of double-stick tape to hold it to the string.


After that, I stuck another circle of the same color on top of it, making a little sandwich and adhering both sides to each other and the string.


After I'd made the first set that fit on my dining room table, I tied them to the wooden dowel at intervals and taped them down. Then I made another set, and another, and another until my hand was puffy from smushing down the circle punch.


The really tricky part (and this is a DUH moment...) is getting it where you want it. Of course, the day I decided to move it, it was windy. My mother lives a block and a half away from me, and I couldn't bear to roll this all up and clip it or any such thing, which would have probably been far smarter than what I did. Because what I did was walk it, down the street, all the way to my mother's house. On a day that was calm in front of my house, but quite breezy in front of my mother's house. So yeah, don't do that, because you will then spend several (thirty) minutes untangling and retaping your precious backdrop. And you won't be that happy about it.

To hang it up, we drove two nails into the brick wall (not kidding) at my mom's house, where we had our wedding reception & party. One of our photographer friends staked out this spot and took pictures of our guests as they walked in to the party!

One of our awesome groomsmen, his lovely fiancee, and my husband. Rawr-ing. In front of the backdrop.

Check out 4th Grade Frolics for even more Monday Made It posts!

Happy Crafting!


Pin It

Super Family Literacy Night: Superhero Themed Reading Events! *Freebie!

$
0
0
Last year, (yes, it's been a whole year and I haven't blogged about this yet - give me a break, I got married :) our reading theme was Superheroes! We used superhero bulletin boards for everything - our GIANT  25 Book Campaign recognition board:

We divided up the space into months and posted each teacher's name under the month. After the 25 Book Campaign for that month had been turned in, we took pictures of each class' students who participated! They were proud to be featured on our board!


Our welcome back to reading board at the front of the school:
 

You can read about that here!

And of course, our Family Literacy Night. The year before, we had a Camping Themed Literacy Night, but this year, our theme was Super Family Literacy!  
The week before the evening we were celebrating literacy, I created student bookmarks, tickets, pledges and stuffed brightly colored (donated) plastic bags with the materials they would need for the evening. I put the reading pledge sheet and the bookmark inside the bag. Some (about 15) of the Reading Pledges had a pumpkin sticker in the corner. If a child received a pledge with a pumpkin sticker, he/she could choose a free book to take home when they turned it in!


To the outside, I stapled their "Super Snack" ticket.


We notified kids that they could wear their costumes because it was a couple days before Halloween. It was absolutely adorable. 

As kids arrived, we handed out the bags and directed them gym floor to listen to the book, Dex: Heart of a Hero being read aloud. It was absolutely adorable - such a precious story about a wiener dog who decided enough is enough! He takes action to get stronger and quicker, and of course ends up saving the day. 


After that, we directed them to complete several of the seven stations we had available to develop literacy and family fun! After completing each station, each child received several pieces of candy in their bags (we had plastic pumpkins full of candy and spider rings at each station). They carried their bags from place to place, completing stations, collecting candy, and having fun!


This was our Smack Attack Station: here, students listened to words being read from cards by the teacher, and then used the superhero-decorated flyswatter to smack the rhyming word!


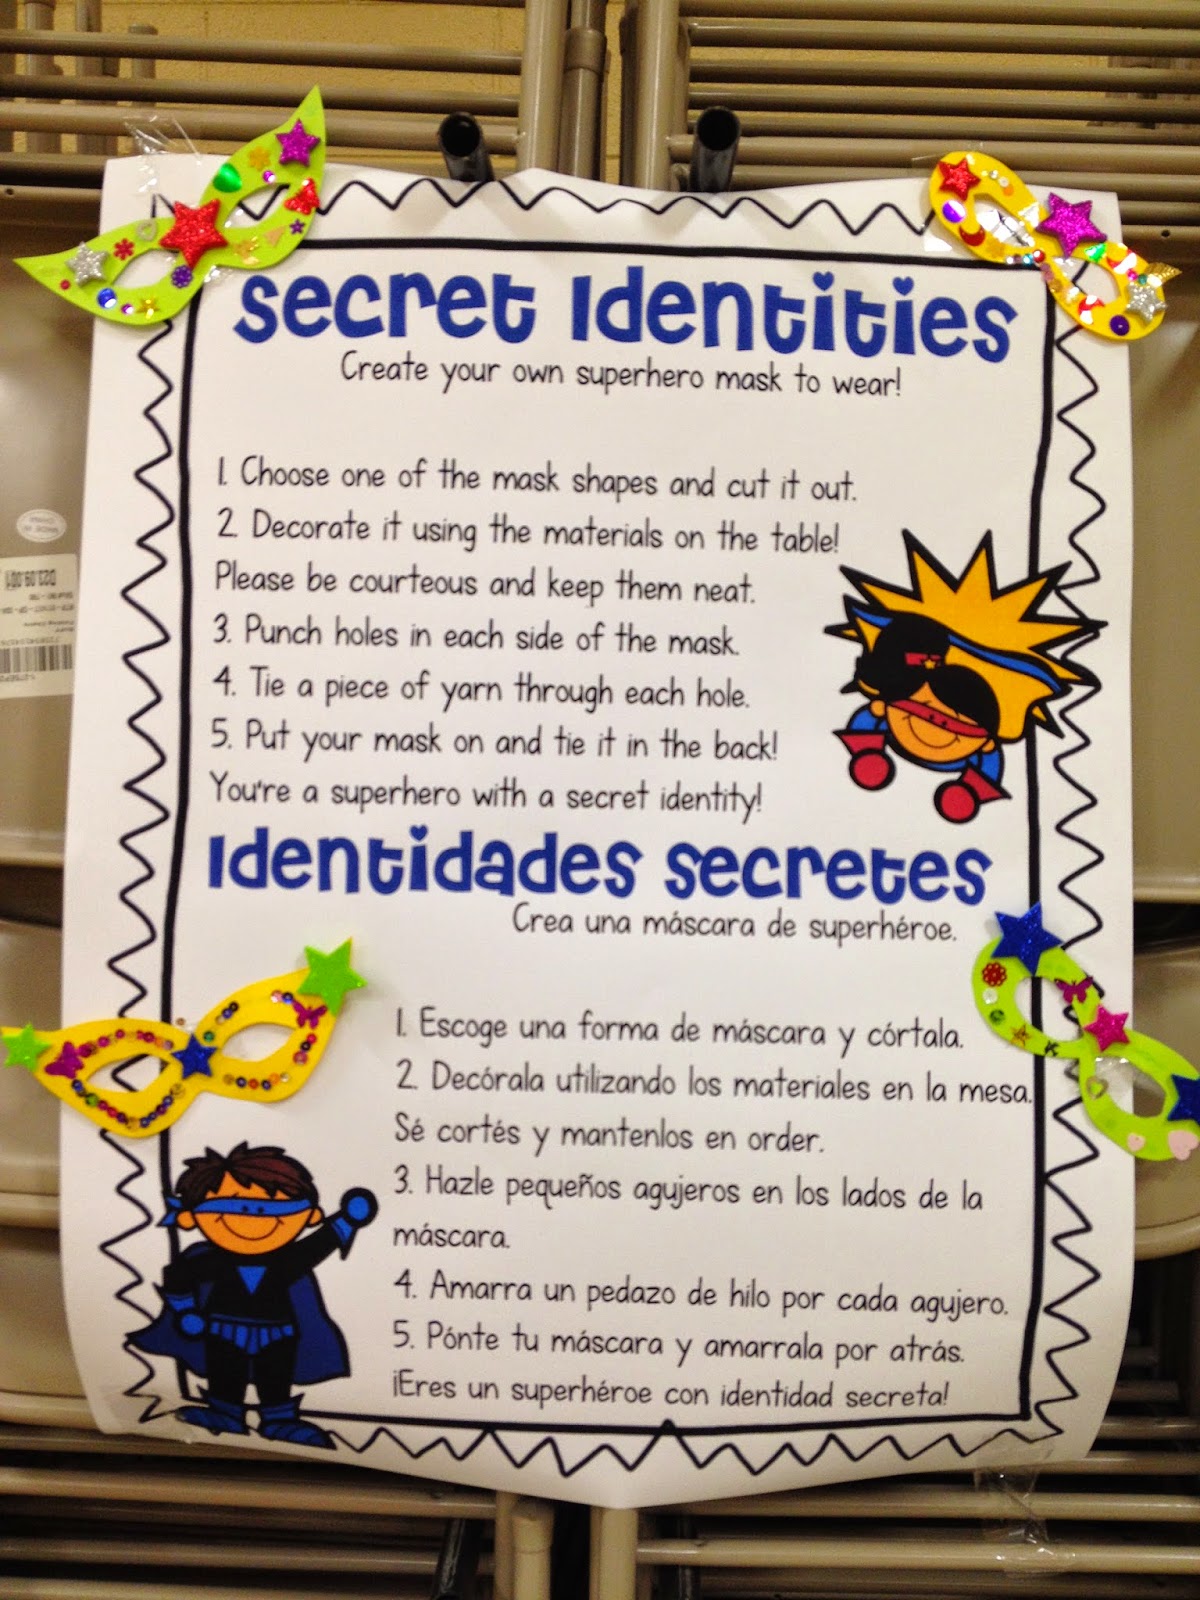
At our Secret Identities Station, students decorated a cardstock cutout of a mask and used yarn to wear it!


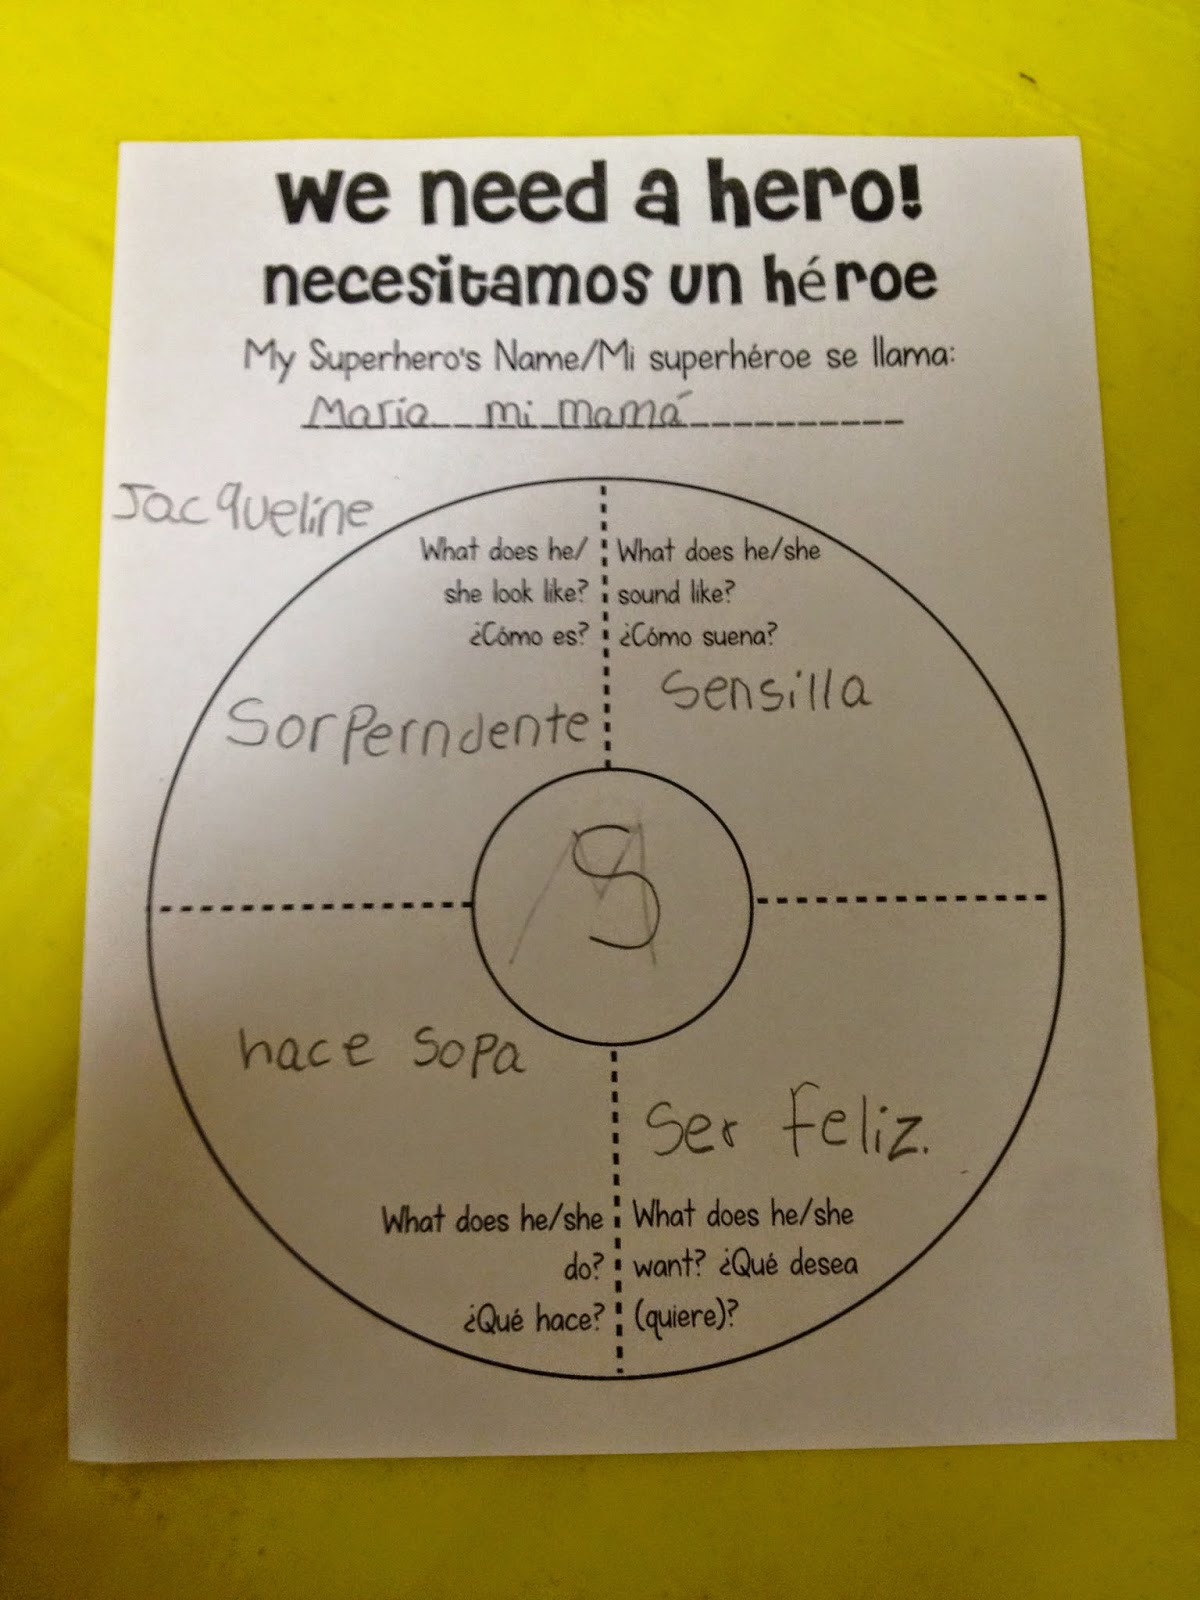
We Need a Hero! required students to create a superhero using alliteration and then illustrate a cover for a comic book!


Everything we do, we do in English and Spanish to grow bilingualism in our students and help our Spanish-speaking parents communicate with their children about these activities.


At this station, This Looks Like a Job For..., students used a sentence strip to create a comic book about a superhero! 


At the Super Snack Station, kids decorated cookies to look like superhero symbols! Each student received one snack ticket as they arrived, stapled to their bag. When they arrived, we collected the ticket to help make sure we didn't have repeat customers at the snack station!


Of course, we had a building words station! Kids wrote "Superheroes read" on a sentence strip and cut between the letters to make cards. Then they built as many words as they could using those letters - parents actually got pretty competitive here! 


Our most simple station was the Reading Headquarters. We used the gym stage and added some cozy furniture and a rug to make it an inviting area to read in! We added some baskets of high-interest books and (here's the best part) made capes out of plastic tablecloths and yarn! Students donned a cape and read a book with their buddies in Reading Headquarters! Even some of our older students enjoyed doing this!


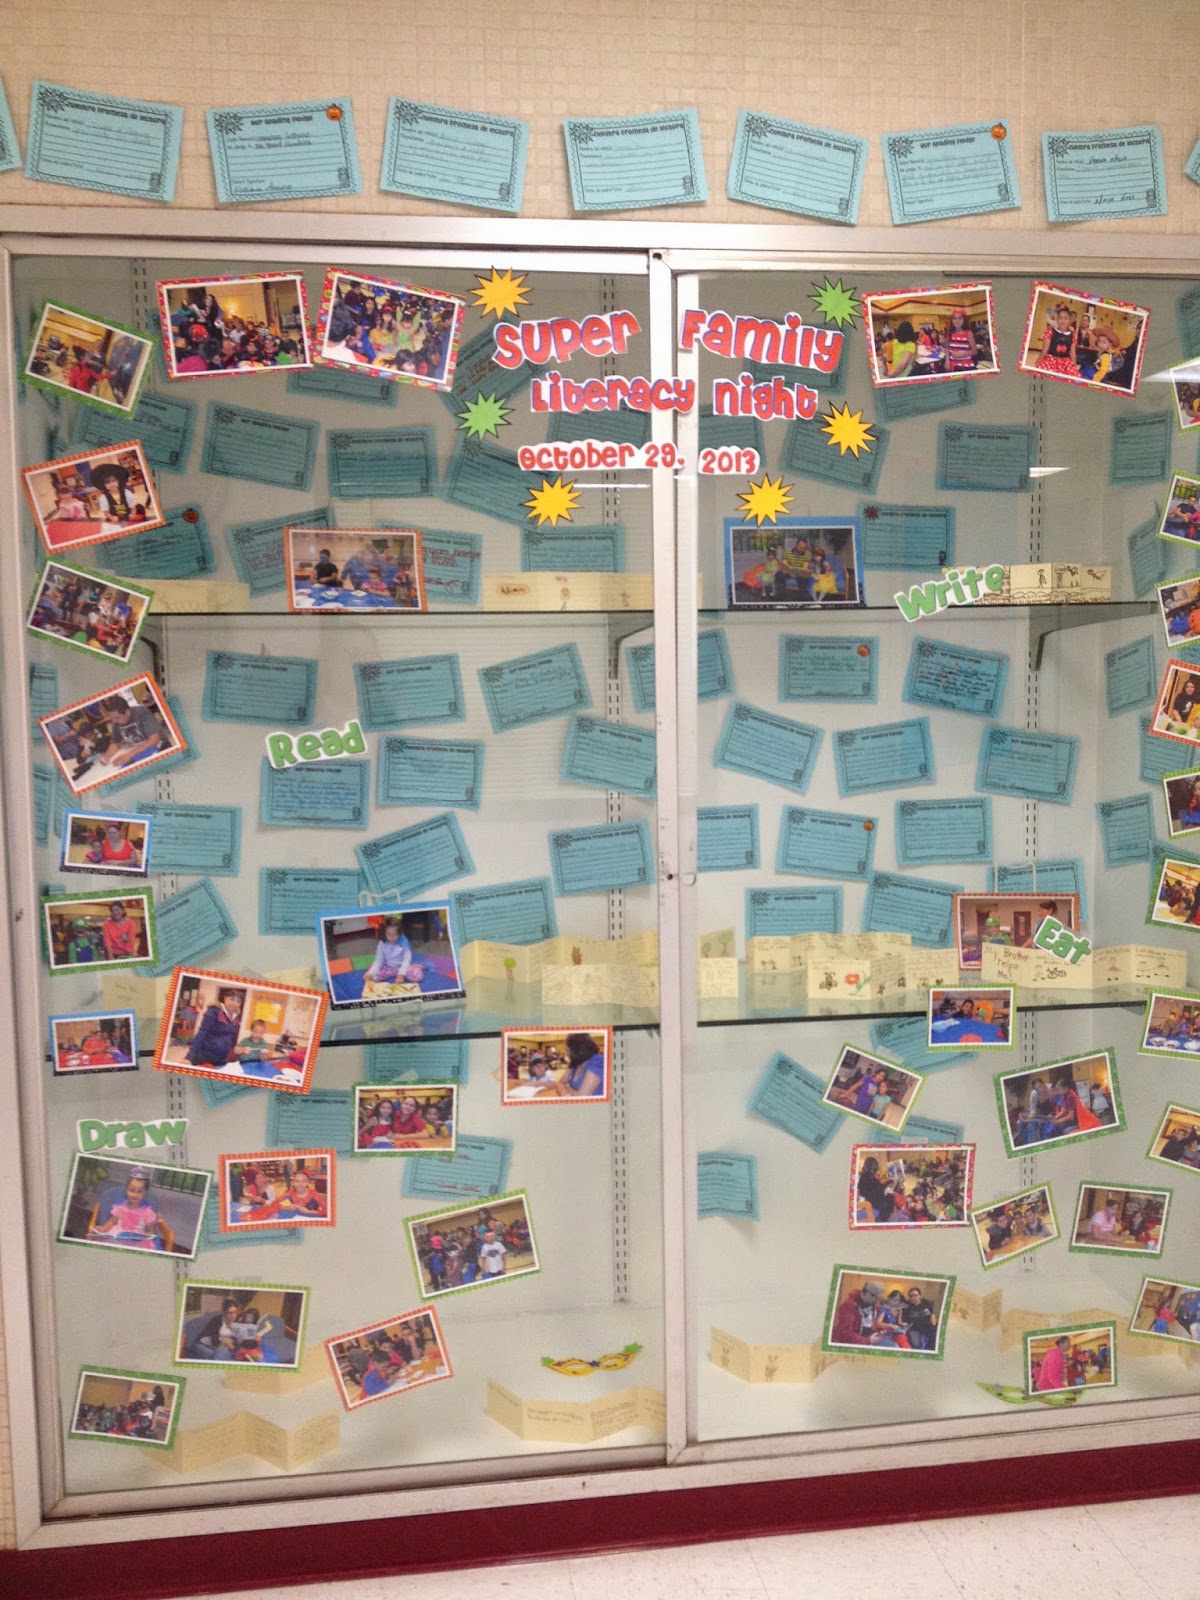
A week or so later, I finally took all the pictures, pledges, and student products we had been given, and created our Super Family Literacy Night display in one of our glass display cases!


To grab the materials I made for our Family Literacy Night and to host one of your own, visit TPT and check out my new Super Family Literacy Night Materials!


And here's a free page from the Super Literacy Night Materials: superhero printable bookmarks with reading tips for students and parents!


Pin It

Schoolwide Writing Contest: The Best Part of Me

$
0
0

Last year, we hosted our first school-wide writing contest. The prompt was something my principal found that could be accommodated to suit writers of all levels: The Best Part of Me. 
This prompt is general, yet personal. Students can share as much of their souls as they choose, so it made a beautiful end-of-year writing piece, but I could see it serving well at the beginning of the year, too, to help you "get to know" your kids, and to help them see each other as real people. And because you would model, model, model, they would get to know you, too!
I recommend reading at least two books to help activate language and ideas. A couple of the books I pulled out and put into a basket for our teachers were:
And this one, although I haven't read it, looks like it would serve really well!


As you read and activate language and ideas, chart them out! These are a couple sample charts.
This is a sample I provided my teachers with: During a class conversation, chart out the different body parts and the reason that part is the best part of you! 


One of my teachers built this chart with her kids to help them think of options. 


And if you're ever stuck for inspiration, PIN! These are some of the great pins that helped our teachers think about helping students write in response to this prompt:

Each teacher selected one piece to represent their class. I am not sure how they did this. I only had to choose between five or six for each grade level and it was excrutiating. How they chose between twenty or so kids is pretty impressive.

I mean, I know they used a rubric. I just think it's hard.

From there, we chose a grade level winner. This posed another challenge. I am working on it, but I am not yet a fluent Spanish speaker or reader, as many (over half) of our students are. Kids in grades K-4 wrote their pieces in Spanish if they were in a bilingual classroom setting. I had to call in for (bilingual) reinforcements to help me judge the pieces to make sure everybody had a fair shot!


Each grade level winner received a "First Place Winner" certificate and each class winner received a "Distinguished Writer Award". 

This piece, albeit short and simple, was especially moving. The student who wrote this piece is not used to winning much of anything, really, and his smile stretched from ear to ear when he went up to receive his certificate. 

Here's an adorable display that one of our teachers created out of their students' work!

Pin It

Bright Idea: Creative Writing Response for Any Book

$
0
0


It's another Bright Ideas Link-Up! I'm so excited to participate in one of the best link-ups I've seen. Teachers share great ideas from their classrooms, and not a product in sight. Just lots of super ideas for the classroom! 


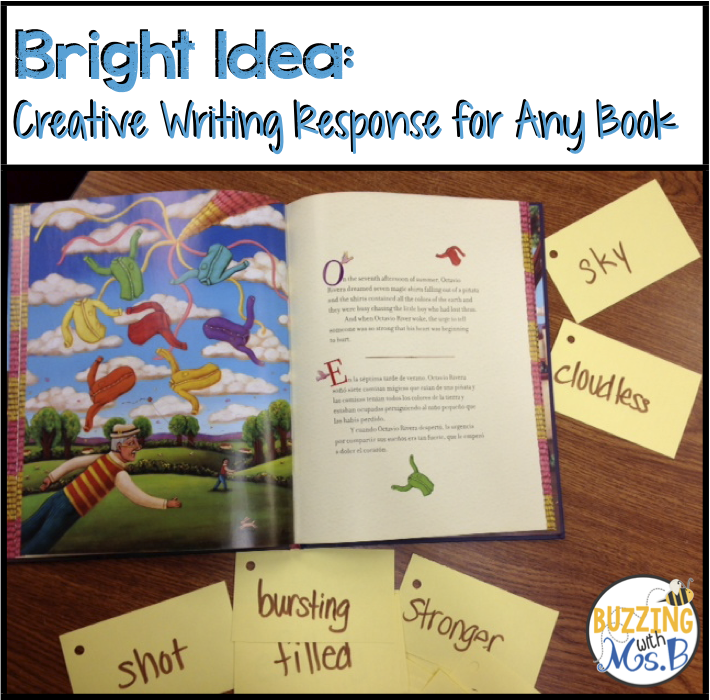
My post today is a simple strategy to help students respond to any text, whether it's a poem, a story, or even informational text. We used it last year to respond to this book: A Perfect Season for Dreaming by Ben Saenz. 


The beauty of this strategy is how accessible it makes writing to kids with limited vocabularies. Here are the steps:

1. Set your purpose for reading: to notice and record interesting words. As you read the book aloud to the students, record the interesting words they enjoy on index cards. Each group of students can create their own set of index cards, if you'd like, or you can make a class set. 


2. Sort the words. To help students understand their new words and their usage, sort them into different groups. We sorted into different parts of speech: verbs, nouns, adjectives, and adverbs.


And then we sorted into different tone words: positive and negative. 


4. Use the words to create a poem. Students can use the words on the cards to create lines in their poem. They can also add words to help their poems make sense.


This was the poem that we made out of these cards:

Summer arrives, bursting into flame.
Colors escaping from every bloom.

The cloudless sky
is shot with yellow sun.

How easy is that?! And yet, the kids really took off and shared some beautiful writing! One of our third grade teachers had students use the words to write about a special relationship they shared with someone else, because the book, A Perfect Season for Dreaming, describes the relationship between the grandfather and the granddaughter. Through using these words, students were able to describe their relationships beautifully and with complex language. 

I hope you try it! If you do, I'd love to see pictures!
If you enjoyed this post, follow me on Facebook, Instagram, or TPT!
For more bright ideas from more than 100 different bloggers, please browse through the link-up below and choose a grade or topic that interests you! Thanks for visiting the Bright Ideas Link-Up!
Pin It

Sequencing the plot's events with The Sweetest Fig

$
0
0
So I'm sitting here in my house, drinking White Zinfandel (what else) and watching SVU. It's like a blast from the past. Because this is what I love to do when I blog. Except today, I am not completely doing what I love to do. Because there is a mosquito in this house. I HATE MOSQUITOES. They eat me up. I just got up from the computer to spray myself with Off! And I'm INSIDE my house! Arrgh!

Anyway...

The last two weeks have been a little hectic. One of our kindergarten sections was too small and had to close, and one our fourth grade sections were too large and we had to open a new one. That means - have you guessed it yet? - that our kindergarten teacher had to move to fourth grade. Three weeks after school started. WHAT?! I know. In her shoes, I would've cried. Daily. Like, every day all the time. She's been a trooper and so lovely to work with!

Anyway, to help her with the transition, and the kids too, I spent reading and writing in her classroom for about two weeks. And I LOVED it! Oh, I can't tell you how much I miss having a class of my own. 

So I had a blast. We were working on the idea of plot, which I connect very tightly to fiction structure. Fiction structure, as you've probably heard, can be very clearly represented with Freytag's Pyramid, which looks like this, basically:


The pyramid includes a few basic pieces.
Exposition: we are introduced to the main character, their trait, their motivation, and the setting.
At the end of the exposition, we find the problem. This is often the opposite of what the character wants. 

Then there's rising action. During this time, the problem grows or the character tries to solve it.
At the point of the climax, the problem has reached a peak point. Either it will be solved (often by a decision the character makes), or it will be impossible to solve by the character. Either way, there is a resolution to the problem.

Then there's falling action - we often find evidence for the character's change here. They usually learn some sort of lesson from the way the problem was resolved, and the outcome of the resolution can also be found here, at the end of the story.

To help students understand what to focus on, that is, what is important for summarizing the plot's events, we focus on five main elements:

Main Character
Goal/Motivation
Problem/Conflict
Solution/Resolution
Outcome & Lesson Learned

We color code it, just like above. And we chant it, and we sing it, and we dance it, and we gesture it, and we write it over and over to make sure they know what to look for in fiction! I connect these elements to Freytag's Pyramid like this:

The story that we used last week to discuss the plot's main events was The Sweetest fig by Chris Van Allsburg. I personally love Chris Van Allsburg and most of his books. They are so very teachable! 

And, best of all, it's available in English and Spanish!

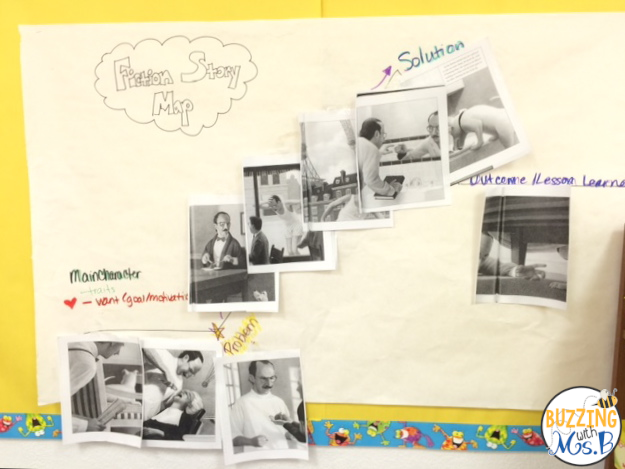
Anyway, I started by making copies of the pictures from the story - not all the pictures; just some important ones I thought were necessary to retell the plot's main events. I showed students the cover of the book, and then I had students in groups sequence the events in the order they predicted they might happen in the book.

And then we read. Students re-sequenced the events based on the story. To help them connect to the pyramid, I took a set of the pictures that were sequenced and we discussed each one. I asked, "What purpose did this event serve in the story?" or "Why did the writer include this event in the story?""Where does it belong on our fiction story map?" and we placed them on the map.

 By the end of day one, students had identified which events represented the main events of the story's plot: who the main character was, what his traits were and what he wanted (motivation). They identified the problem and noticed how it grew. They explained the solution to the problem, and realized that it wasn't pleasing to the main character! Then they described the outcome. 

Come back again in a few days to read about what we did to help students take these events and summarize their reading!

Happy Teaching!
 
 
Pin It

Summarizing in Fiction

$
0
0
Does summarizing make you want to pull your hair out? How many times have you shouted to kids, "JUST THE IMPORTANT PARTS!" while sobbing over a stack of copied 'responses' taken verbatim from the text? 

Well, yeah, summarizing is hard. But if we can give kids tools and a focus, we can help them be far more successful when it comes to fiction summarizing. 

Summarizing requires kids to understand the text structure, determine what's important, and write it in a logical way. Yikes; we're asking a lot from some of our struggling readers. Without the proper scaffolding, they're really going to be playing a guessing game. 

Over the last couple years, I've put together a strategy that has been very supportive of our kids, able and struggling readers alike. This is it:
 
 
Ok, so maybe it doesn't look like much. But trust me, I no longer tear out my hair for lack of decent summaries! 
It all starts with identifying the important events in the plot. You can read about what we did to scaffold students' understanding of the plot's main events here, in my post about The Sweetest Fig. 


From there, we identified these four out of the five elements of the plot:

Main Character
Goal/Motivation
Problem/Conflict
Solution/Resolution
Outcome/Lesson Learned

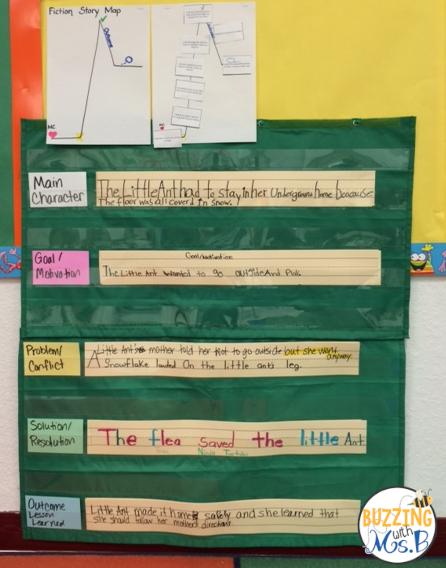
All of these elements are written on colored index cards on a pocket chart. We consistently use the same colors so students will be able to use this system independently. This chart will stay up for as long as we learn about fiction, in order to help students recall the important elements to summarize.


Each team received one sentence strip to create a complete sentence to represent their assigned element. These are the sentences they came up with to summarize the plot's main events from The Sweetest Fig.
 

In case you can't read it, it says, "Mr. Bibot is disrespectful to Marcel the dog. Mr. Bibot wants money. Bibot received special figs, (we verbally added the following) that he wanted to use to be the richest man in the world. But then, Marcel ate the last fig! Marcel's dream came true instead of Bibot's. Lesson Learned: Treat other people the way you want to be treated.

It's far from beautiful, but it includes the important elements, in a logical order! Now it's easy to do some basic revising and include some transition words to write a great summary!

But here's the tricky part. We teach kids to create a summary based on something they've read. This is an essential and invaluable skill. But then, when we test them, we do it differently. They have to find the best summary out of four versions. 

This is very different from what we've asked them to do, and it can be hard for students who are struggling or not as sophisticated in their thinking to make the connection. So this is how I bridge it:

Do you see on the right side of the picture where there are four different paragraphs, all colored up? Those are four different summary versions for The Sweetest Fig. I wrote them myself :) One of them is the BEST, that is, it is the most complete and most accurate, compared to the other summaries - the other three are lacking something, so are NOT the best. 


To have students evaluate these summaries, I asked each student in each group to decide which element they were going to hunt for and grab that colored marker. Some had more than one element. They read through the summary as a group and marked their evidence for each element in the summary. If their element was missing from the summary, they made a little note on the bottom of the page. After they marked up each of the four summaries, they decided which was the BEST summary. Students were very successful with this scaffolding!
 
This 5 element strategy lines up very well with the Somebody Wanted But So Then strategy; they both represent similar elements!

Fisher-Reyna on TPT have some handy free tools to help you teach these elements of fiction as well. Check them out!
Happy Teaching!
 
Pin It

Sequencing and Summarizing in a Folktale

$
0
0
Gosh, I miss having a class of my own. As a literacy coach, the teachers are my students...and the students are our students, but they're not MY students. I have to share them with their teachers. It's hard, sometimes.... and then sometimes, when I see a teacher filling out an office referral, or submitting grades, or doing anything else I don't like to do, I don't miss it so much. But most of the time, I do.

Anyway, this past week, I've been a modeling fool. My modeling career is really taking off in fourth grade, where I'm modeling reading and writing lessons for a teacher who just had to close her kindergarten section and move to fourth grade three weeks after school started.

Don't ask.

She's been great, and I've been loving modeling in her room! This week, we worked on sequencing and summarizing the plot's events in a folktale. Some folktales are great sources for this kind of plot teaching because there's a clear lesson supported by the problem and the solution. To teach this, we chose The Little Ant, by Joe Hayes. He's kind of a local favorite.

We read The Little Ant to students and gave them little cards with the main events of the story.


After the reading, during which students each had a copy, the students used the text evidence to sequence the events in the story. We had them identify the important elements: the main character, her motivation, the problem, solution, outcome, and lesson.

After students sequenced the events, we checked them together using the text evidence from the story. 

Then, we gave each pair of students a fiction story map. They decided on the elements and glued them on.


 From there, we gave each team a blank sentence strip and told them the element they were responsible for. Students in the group wrote a sentence describing their element from the story. They created them in complete sentences. We put them together on our five summary elements of fiction pocket chart to create a super summary of the story.


This scaffolding has really supported students in summarizing and thinking about the important elements in most fiction stories. By generalizing the learning, I'm hoping we've helped them make connections to their own reading!


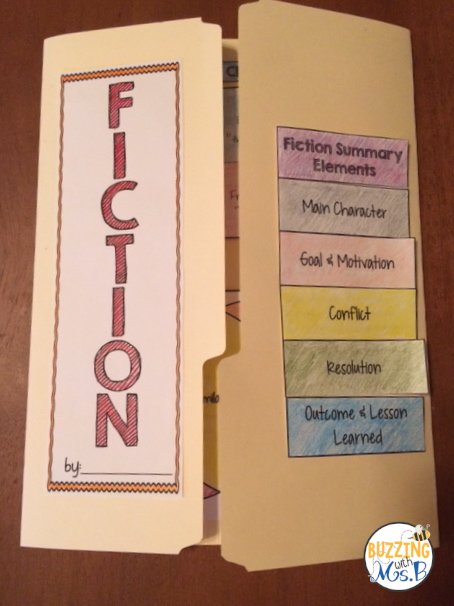
To help kids practice the work we've done during Reader's Workshop to students' independent reading, I created this Fiction Lapbook. It includes folded flap books for students to use when reading their own stories or novels. The skills included are the five fiction summary elements, different types of questions, character analysis, character relationships, cause-effect relationships, and comparing characters! I'm so excited to use it with our kids!


You can get it at TPT!


Pin It

A Super New Blog and Educents Bundle!

$
0
0
I am so excited to finally make our big announcement! Doo-doo-doo-doooo!


Primary Powers blog for primary grades is up and running! This collaborative blog consists of over 20 bloggers who will post about great tips and tools to use in the primary grades! I am so honored and excited to be a part of it.

Is this not the cutest little mini me you've ever seen?!


This month, we'll start our posting. Each post will include a superhero freebie! So check back at Primary Powers for the next month's freebies and super tips!

And the news gets even better because we are celebrating the launch of Primary Powers with an exclusive deal with Educents!


21 instant downloads, over 1,000 pages of materials that are ready to use, and variety of topics to pull your through months of teaching!  $100.75 retail value available for a limited time for $29.99 which is 70% off!  Extreme value alert!

Concepts covered are:  addition, subtraction, graphing, time, money, reading, fluency, spelling, writing, close reading, grammar, story element in fiction and nonfiction, and much, much more!  

Products are thematically correct for the upcoming seasons!  
- spiders and camping for October
- turkeys, Thanksgiving, scarecrows for November
- winter, penguins, the holidays, and New Years for December

Other great items include:
- a calendar that could be used as a parent gift
- a data folder to track student growth
- literacy and math centers
- printables
- units of study

Check out the previews below... 

My item for the bundle is my Government Pack. It's my most popular product, full of organizers and activities to teach about US government!


More great products included in the bundle...


Happy Teaching!


Saturday English Camp: Pancakes, Pancakes for second graders!

$
0
0
Last year, we hosted three Saturday English Camps and invited our students who are struggling to make growth in English to attend for free! It's a big challenge for our teachers and students to grow in their English capacity when so many of our kids have little exposure to language at home, come in speaking Spanish only at home or demonstrating a strength in neither English nor Spanish. This is one of the initiatives we've tried to help our kids who are stuck in one level of English acquisition.
The main focus of our English camps were listening, speaking, reading, and writing in English. We incorporate fun, hands-on activities, and language acquisition strategies such as chants, songs, poems, GLAD charts, etc. 
First, our second graders read Pancakes for Breakfast by Tomie DePaola, a wordless picture book classic!


Then they sequenced pictures from the story to retell using sequencing words such as "first,""after that," etc. 


The teachers called them up in groups to watch pancake batter start to bubble and cook on a griddle and the kids described that they saw using specific and scientific language.
Once enough pancakes were made, and students had finished writing about the changes they saw in the batter, moving from a liquid to a fluffy solid and releasing gas, they came back up to the table and explained which toppings they wanted on their pancakes. 


And then they scarfed. So tasty! And so much fun while learning English!

Pin It

November Math and Literacy Centers and Stations: Fun Turkey Themes!

$
0
0
Are you a planner? Are you completely ready for November? Well, good for you. Go to some other blog where they're already hand-crafting their own Christmas decorations. Because this is not that kind of blog. I'm just cutting out some stuff for November! These are two of my math and literacy stations that are perfect for this time of year!


In this activity, students have to work out the multiplication problems on the pumpkins. They round the answers to the nearest hundred and sort them into products that round to 100, 200, 300, or 400! 


The entire Turkey Time Math Centers set includes the above activity, a multiplication roll and color center, fact family matching activity, word problems, and arrays. Every activity includes an answer sheet and answer key! Grab it at TPT for only $3.00!


This is from my Gobbling Up Words Word Work centers. In this center, kids read the words on the cards and sort them into one, two, or three-syllable words.


The rest of the Gobbling Up Words Word Work Center set includes a fun Old Maid-type game called Old Crow to practice plural nouns, a compound word building activity, and a sight word choose & color center. Everything is in a fun Thanksgiving theme! Recording sheets are included!

You can get this at TPT for only $3.00 too! For just $6.00, all of your math and literacy stations can be taken care of for November!
Pin It

Five for Friday! Halloween edition

$
0
0
This week was ca-razy. The kids were actually really great, but we had so many things planned that I am dead tired. 


One

Because this was Red Ribbon Week, just getting dressed appropriately in the mornings was a real challenge. This was Give Drugs the Slip, so I pulled out my Clifford slippers and flopped around in them all day.


Two

On Team Up Against Drugs Day, I busted out my favorite team shirt: Go Yanks!


Three

We had an early release day this week. My math/science counterpart had already planned a training on learning targets and he delivered it beautifully. But, of course, we had to pause for some tasty treats courtesy of our principal and office staff.


Four

On Thursday, I made some tasty treats of my own. To thank the teachers and staff who had worked hard to make Family Literacy Night successful, I made them some deeelicious cupcakes. I don't know if you've tried the new Cinnamon Bun frosting, but holy cow. It is amazing.


Five

On Friday, we had a fairy tale ball for the students in K-2. It was SO MUCH FUN. I dressed up as Gretel and we were introduced red carpet-style. We danced the afternoon away and left feeling exhausted and disgusting in our costumes. 


Go check out Doodle Bugs Teaching and see what other great pictures people have shared for this week! Or link up yourself!


Pin It
Viewing all 369 articles
Browse latest View live